
The frontend form has no business knowledge. No hardcoded rules. No conditional logic for what makes a date valid or a reference number acceptable. It receives a JSON description from the backend and wires itself up accordingly.
That simplicity took some deliberate design to reach. This is the consumer side of the recipe pattern. If you missed the first post in this series, it covers the why: the problem of duplication, drift, and what happens when frontend state goes stale.
Getting the Recipe
Before the form renders, the frontend makes a GET request to a recipe endpoint. The endpoint returns the validation rules alongside any data the form needs. For a new record, that means defaults and dropdown options. For an edit scenario, it means the existing entity values plus any fields that are now read-only.
The response looks something like this:
{
  "succeeded": true,
  "data": {
    "entity": { ... },
    "validationRules": {
	"fields": {
  	  "JournalEntry.EffectiveDate": {
	    "required": {},
		"limitedTo": [
		{
	  	  "fieldName": "JournalEntry.EffectiveDate",
		  "operator": ">=",
		  "fieldValue": "2026-06-01"
		},
		{
		  "fieldName": "JournalEntry.EffectiveDate",
		  "operator": "<=",
		  "fieldValue": "2026-12-31"
		}]
		},
		"JournalEntry.Subject": {
		  "required": {},
		  "limitedLength": {
		    "min": 1,
		    "max": 250
	          }
	  }
	}
    }
  }
}
That is the recipe that helps the user accomplish a task.

Parsing: Translating Names
The first thing the frontend does with the recipe is translate field names. The backend uses dotted property paths tied to its command structure: Invoice.ReferenceNumber. The Angular form model uses camelCase without the prefix: referenceNumber. A parser strips the prefix and transforms the key.
// Backend key:    "Invoice.ReferenceNumber"
// Frontend key:   "referenceNumber"
This translation is explicit and centralized. If the backend renames a field, the parser catches the mismatch. It’s a narrow, testable seam between two naming conventions.
The same parser rewrites field names inside conditional required rules, so cross-field comparisons reference the correct form control names after translation.
Generating Validators
Once parsed, the frontend generates Angular ValidatorFn arrays from the rule objects. Each rule type maps to a specific validator or combination:
| Recipe rule | Angular validator |
|---|---|
required: {} |
Validators.required |
limitedLength: { min: n, max: n } |
Validators.minLength(n) + Validators.maxLength(n) |
pattern: { regex: "..." } |
Validators.pattern(...) |
email: {} |
Validators.email |
limitedTo: [...] |
custom comparison validators |
The form controls receive these validator arrays and the user sees immediate feedback while typing. The form made no business decision to get there. It was handed constraints and told to apply them.
Conditional Required: The Group Validator Case
One rule type doesn’t produce a field validator at all.
"Schedule.EndDate": {
  "required": {
    "when": [
      {
        "fieldName": "Schedule.IsPermanent",
        "operator": "=",
        "fieldValue": false
      }
    ]
  }
}
“End date is required when the schedule is not permanent” is a cross-field relationship. Angular handles cross-field validation at the FormGroup level, not the FormControl level. So the frontend generates a group validator and attaches it to the parent form group instead of the field.
This was one of the design insights that came from building the consumer side: not all recipe rules produce field validators. The code has to distinguish rule shapes and route them accordingly.
Two Kinds of Errors
So far I’ve described the pre-validation path: recipe arrives, validators are generated, the user gets feedback while typing. But there’s a second error path that activates after submit.
When the form is sent, the backend runs its full validation. If something fails, it returns a structured error response:
{
  "succeeded": false,
  "message": "Journal entry not recorded.",
  "errors": [
    {
      "propertyName": "JournalEntry.Date",
      "errorMessage": "Date falls in a hard-closed period.",
      "attemptedValue": "2026-05-26"
    }
  ]
}
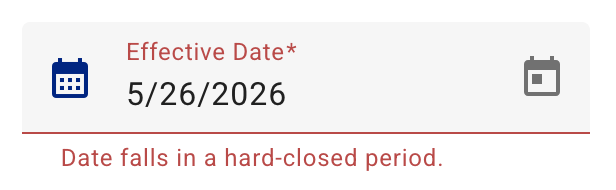
These are different from pre-validation errors. They describe conditions the frontend couldn’t have known: a closed period, a reference that no longer exists, a state that changed while the page was open. The frontend maps them back to form controls by propertyName and sets field-level errors — the same inline style the user already knows, but now the message comes from the backend.
When the Backend Sends Rich Context
Sometimes a rejection carries more than a message. An approval might fail because a payment exceeds an authorized threshold, and the user needs to understand exactly why. The backend can include structured context alongside the error:
{
  "propertyName": "Payment.Amount",
  "errorMessage": "Amount exceeds authorization limit.",
  "customState": {
    "remainingPayableBalance": 4250.00,
    "approvalEligibility": {
      "isEligible": false,
      "reasons": ["Requires two-approver sign-off above $5,000"]
    }
  }
}
The frontend parses customState and displays a richer explanation. It didn’t decide anything. The backend gave it enough context to be genuinely helpful.
The Shape of This in Code
The wiring in practice is a short pipeline:
- GET the recipe endpoint, unwrap the response
- Parse field names: strip prefix, camelCase transform
- Generate per-field validators from rule objects
- Generate group validators for conditional required rules
- Apply both to the form controls and form group
- Apply read-only metadata and disable controls where indicated
Each step is a pure transformation. The recipe JSON goes in; a configured form comes out.
What’s Next
Post 3 goes into the backend side: how the recipe is built, what rule types it can express, and how FluentValidation ended up in the picture. That last part is worth a separate explanation — it wasn’t part of the original design.





Leave a Reply