Posts Tagged mac
Zooming Tools for PC and Mac
Posted by claudiolassala in Productivity on March 15, 2016
Zooming tools are very useful whenever doing a presentation or training. It helps both the people at the back of the room, as well as drawing people’s attention to the area of the screen you need them to be looking at.
On the PC I’ve used ZoomIt, which is part of Microsoft’s SysInternals tools.
Recently I’ve found Zoom It for the Mac, which is cheap, and works like a charm.

Integration of Beyond Compare and Parallels on the Mac
Posted by claudiolassala in Software Development on February 23, 2016
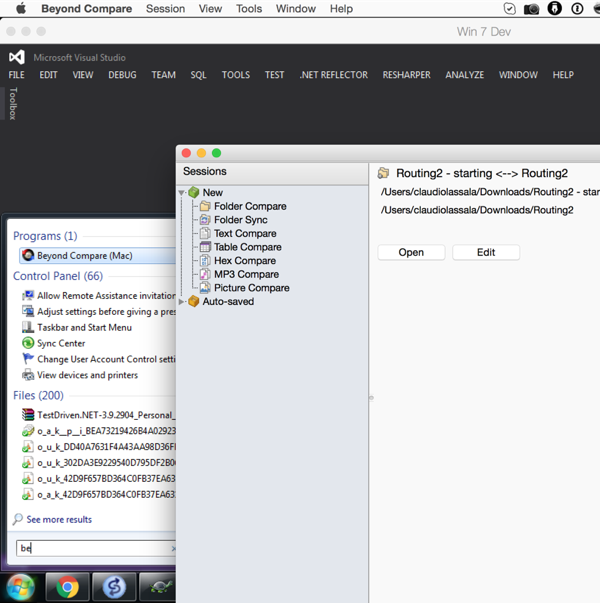
I’ve been using Beyond Compare as my tool of choice for file and folder comparison for a long time now. When I first moved to the Mac world there wasn’t a Mac-version available yet. That was a bummer. Fortunately, now there is one now.
When I need to do work on a PC, I run a Windows virtual machine on my Mac using Parallels Desktop.
I’ve just learned recently that I can use my Beyond Compare on the Mac directly from within my Windows virtual machine (at least using Parallels). It works just like that: I invoke the comparison from inside the virtual machine, and Beyond Compare pops up on my Mac (the host). Pretty nifty!
One great benefit is that I can have just one license of Beyond Compare for the Mac, instead of having licenses for both the PC and the Mac.
So much easier when there are TESTS!
Posted by claudiolassala in Software Development on October 20, 2011
I’m bruised after fighting my own Ruby/Mac noobness in the last couple of days, but I think I’ve learned a bunch of things after this.
I was a nobody…
When attending to Houston TechFest last week, my buddies told me that if I’m not using RVM I’m a nobody. 🙂
I hadn’t had a reason to use RVM, to be honest. I’ve been mostly working on projects running Ruby 1.8.7, and haven’t really had time to look into the new features/fixes introduced to the language. Ben mentioned improved performance, which is a very good reason, but I felt I wasn’t ready to migrate just yet (I had heard of people having some issues, so I thought I was going to save that “fun” for later).
Well, little did I know what was coming up the very next day…
It all started with some weird errors in Heroku
I pushed some changes to Heroku, and when I went about testing the application, it started to crash in points unrelated to my changes.
After analyzing the logs, the core problem seemed to be related to the allowed quota on my database being reached (I’m running the free account right now). I thought, “well, let me just reset the database, since this is all junk data anyway“. Apparently, db:reset isn’t available for MongoDB on Heroku. I tried to clean up my local database and push it up, but something went wrong there.
I then decided to just ‘destroy’ the app on Heroku, and recreate it. That’s easy enough…
Off to new errors…
Once the application was redeployed to Heroku, I started to see new errors in the log: they were Ruby syntax errors that I didn’t use to have before. After giving it some thought, I’ve guessed that Heroku’s default for new apps is currently Ruby 1.9.2, whereas my app used to be running on 1.8.7. My guess turned out to be correct as confirmed by Heroku’s tech support a couple of hours later.
Time to upgrade Ruby version? RVM!
My first reaction was to upgrade to Ruby 1.9.2, as that should address my Heroku problem (later, their tech support told me I could specify what version I wanted my app to run on in their stack… but at that point, it was too late, as I had gone quite far down into the upgrade path).
Installing RVM was easy by simply following the installation instructions on the website. After that, however, my environment didn’t have bundler, so I installed it with gem install bundler.
Next, time for bundle install. I started to get errors related to certain gems, which were actually easy to fix by upgrading gems, changing versions, etc. But there was one that seems to always be the worst nightmare: RMagick. I remember last time Ben and I had to hack something to make it work. This time I found out this Magick-Installer script, which worked like a charm (it took like an hour to download and install everything, though).
Installing stuff from Bash
I’m still pretty much a Bash noob. When I looked at the section of how to install Magick-Installer script, it was kind of cryptic to me:
“Download and run this simple script and watch your ImageMagick support go from 0 to 1 without MacPorts.”
Download and run. Hmm… *how* do I do that? I’m kind of used to download a zip file and double-click on whatever comes out of it, but I couldn’t find anything similar there. But then, I recalled the instructions I used to install RVM just a little earlier, so after clicking a link to the Magick-installer.sh file on Github and clicking on the “Raw” link in there, I found out the direct link to the actual script file. Then it was easy:
bash < <(curl -s https://raw.github.com/maddox/magick-installer/master/magick-installer.sh)
Use curl to download the file, and bash to run it. I shall not forget that.
Yeah, yeah, you bash badasses out there are laughing at me right now… well, I’ll give you one more reason to laugh: I’ve run the command above inside of one of my project’s folder, instead of running it inside of a temp folder, as I came to find out when I looked at the status of my Hg repository and it showed me hundreds of files had been added to it…
Mercurial cleaning up my mess
…well, good thing I’m using a version control system, right? Once I figured out the mess I created, reverting it was just a matter of running hg revert –all. No more harm done.
Me messing Mercurial up
At one point, I committed a “gemfile” to my repository, without realizing it wasn’t the same “Gemfile” I already had in there; no idea where the new, all lowercase file came from. Whenever it was time for me to merge my branch into the trunk I get a nasty surprise: some “case-folding collision” on “gemfile”.
I’ve tried what seemed like a million things, including the steps outlined here, but none of it worked. Eventually I realized I had a good copy of my project on Heroku, so I pulled it down, dropped into the project’s folder where the Hg repository is, and managed to merge it that way, and I was back in business.
Swapping Gems due to versioning issues
I was using HTTParty in order to make a post call to a service that returns an XML fragment. For whatever reason, after the upgrade, HTTParty (or rather Nokogiri, which is used internally to parse out the responses) couldn’t handle the XML fragment in the response I get from the service.
Fortunately, my dependency on HTTParty was encapsulated in a single spot, so I was able to quickly swap it and use Patron instead. Looked like it was going to work fine, but when I deployed to Heroku I got errors when compiling the native extensions. I look it up, and I find out I’m supposed to use an older version of Patron. I try out the older version, and it doesn’t work on my local environment (WebMock had trouble mocking calls to Patron).
I then look *that* up, and somebody recommends RestClient, which worked like a charm.
Tests helped. A lot!!
I have a bunch of Cucumber and RSpec tests. They were VERY helpful pointing out things I needed to fix after upgrading to Ruby 1.9.2.
Besides certain syntax errors I had here and there, I got quite a bunch of errors related to Mongoid relations; I was using “reference_many” and “referenced_in”, instead of “has_many” and “belongs_to”, respectively.
After fixing most of those issues, I got stuck in a case where I had some metaprogramming magic going due to a misunderstood requirement. I had gotten clarification on the requirement with the client a month ago and added an item to my tracker in order to come back and clean that up later. Well now was the time to do it.
Thanks to my tests, I was able to fix my upgrading issues *and* clean up my code, refactoring parts that were written when I knew much less about both Ruby and the domain I’m working on.
Not bad…
Everyday I can feel my noobness on Ruby, Rails, Bash, Mac, etc. I’m working by myself, so there’s nobody sitting by my side I can turn to when I get stuck with stupid stuff. I have a couple of buddies who I ping on Skype or Twitter, and who are *very* helpful, but I try to keep that to a minimum, since everybody’s always busy with their own stuff.
Considering all of that, I’m feeling very good after the struggles I’ve had in the last couple of days, as I managed to get stuff done, and learn a bunch of stuff while doing it.
The single most important factor that allowed me to be brave and knock down every single hurdle in front of me? TESTS, TESTS, and TESTS!!
Setting an iPad as an extra monitor
Posted by claudiolassala in Productivity, Software Development on September 1, 2011
A couple of months ago I blogged about my work environment. It’s changed a little bit since then as I embraced my MacBook Air 13” as my main work machine.
As somebody who’s been a big fan of working with multiple monitors for sometime now, I had my Mac hooked up to one of my big monitors. Given that I also have an iPad, I’ve just recently added it as my third monitor, by using the Air Display app for iPad/iPhone ($10). It works really well! And considering I already owned an iPad, this is the cheapest extra monitor I’ve added to my setup. ![]()

The iPad sits on the far left side, and I normally put a Terminal window there, where I’m running my commands, tests, deployment, etc. The screen on the Mac is where I normally have the browser showing the website I’m building, and the monitor to the right of my Mac normally has my IDE. That monitor on the far right is hooked up to my PC, which I use for my music recording, video editing, research, running the Virtual Brown Bag, etc.
I have tried to use Air Display to make my iPhone as yet another monitor (to maybe put small notes or instant message there), but that didn’t work too well for me. But I’m really digging having my iPad there. It’ll also come in handy when I’m on the road.
My first steps into Mac land
Posted by claudiolassala in Productivity, Software Development on July 21, 2011
After two decades of working with PC’s, as I’m into this mood of trying out different things now, I’ve decided to get me a Mac a couple of weeks ago. I’ve been doing Rails development for a few months, and I kept hearing and seeing people say that the Mac is a much better platform for that, so I decided to give it a go, since now that’s what I’m doing fulltime.
Which Mac to get?
I have two big monitors hooked up to my PC, so getting a Mac Mini and hooking it up to one of my monitors was one of the options. But then what do I do when I have to go on trips, clients, conferences, etc.? I need a laptop. But then again, which one?
I friend of mine had just purchased a MacBook Air; the 13-inch screen one. At first I thought it’d be too small for me, but playing around with my friend’s it actually felt alright. The machine seemed really fast despite its size, the battery lasts for several hours, and a thought dawned on me: if I had one, I could hook it up to one of my big monitors when working from home, and I’d had a very portable laptop to take with me on trips. So that’s what I did: 13-inch MacBook Air, with 4Gb of Ram.
How to get used to it?
My prior experience to using a Mac had been about 20 minutes playing with somebody else’s machine. Because of that, I decided to just set it up on the side initially, so I’d do most of my work on the PC where I’m 100% comfortable, and just go to the Mac in order to install programs, try small things out, get used to the keyboard and multi-touch trackpad, etc.
I have to say, several times, I feel totally useless. Main reason being just now knowing how to do the most simple things: for instance, where’s the context menu (right-click menu)? What’s with delete/backspace? Where’s home/insert/pageup/pagedown…? How do I work with the Terminal (console) window? Can’t tell you how frustrating it is to get stuck in those things when you’re trying to get something done.
In order to speed up me getting used to it, I had to quickly set it up to make it somehow feel like it does when I’m using Windows configured to my taste. I guess that takes me to what’s probably the single most important thing when using a computer…
An Application Launcher
A very long time ago I was already very particular about finding ways to quickly launch applications or navigate to places on computer. On Windows, for a while I’ve used “Start->Run…”, WinKey+R, the Address bar tweaked into the taskbar, etc. Then I’ve found SlickRun, which I’ve used for several years. Then, when showing and talking about SlickRun two years ago at a Virtual Brown Bag, somebody showed Executor, which I totally embraced every since. In fact, when I’m building a Windows machine, right after installing the Operating System, Executor is the very first application I install; this is, easily, the application I use the most on Windows (I should really write a post about how I use that tool…).
So, I needed something similar for the Mac… really bad! Alfred was it. I haven’t fully explored this tool yet, but it gives me 80% of the features I use most of the time in Executor. The free version has the “application launching” features, but I’ll be getting their PowerPack version soon, which adds the “folder navigation” features (which I use a lot on Windows), among other things. Ah, it also adds “clipboard history”, which on Windows I’ve been using ClipX for.
Another things that Alfred gave me is the ability to lock the screen (sort of like WinKey+L on Windows), which is another thing I use every time I walk away from my computer.
The Development IDE
Obviously, as I’m going to be primarily using my Mac for development, I needed an IDE. I understand people use TextMate, MacVim, etc., but I needed something that can get me productive as quickly as possible. Like I’ve mentioned a couple of weeks ago, I’m using RubyMine on Windows for Rails development. As it turns out, that tool also runs on Mac. Sweet. The main thing for me has been to just remap the keybindings so it somewhat resembles what I have it configured on Windows.
The Console
I’ve been using the command prompt (DOS) on the PC ever since I started working with computers, and then PowerShell in the last two years or so. I had never used Bash before (well, I did try it for 30 minutes a few months ago, got stuck, and gave up). Well, now I do need to learn it, since that’s what I get in the Mac’s Terminal window. I need to review Joshua’s presentation on Bash, as well as watch PeepCode’s Meet the Command Line and Advanced Command Line videos.
Source/Version Control
For source control, I’ve been using Mercurial. On Windows, TortoiseHG works really well for me. On the Mac, I’ve started to use MacHG; I can’t say I’m 100% happy with it, but it may still be just be been uncomfortable with the environment as a whole. One thing that got me at first is that I needed to install Mercurial in order to be able to access the “hg” command in the Terminal window. After I did that, things worked fine.
One more thing: when trying to open a project in RubyMine that has a Mercurial repository, we’re asked to provide the path to the hg executable, which I had no idea where that’d be. Found it here. One of my buddies pointed out I could also run “which hg” on the Terminal window, which tells me the path to the given executable.
Also, Mercurial only accepts commits if it can find a username. In order to do that, we need a global .hgrc file in the “home” directory containing those settings.
Diff Tool
BeyondCompare has been my Diff tool of choice for several years (for both files and folders). Unfortunately, it doesn’t run on Mac (as far as what I’ve read, it’s because it’s written in Delphi, which doesn’t run on Mac…). After asking for recommendations, I got to DeltaWalker, which seems very similar to BeyondCompare. I’m using its trial to see how it feels. It’s supposed to have easy integration with Mercurial and Git, so I’m hopeful, as BeyondCompare integrated really well with my workflow on Windows.
MongoDB
I’ve been using MongoDB on my Rails projects. In order to get it going, I’ve followed the instructions here. Which has led me to Homebrew. In order to get Homebrew going, I needed XCode (5 bucks). After that, all was good.
Where’s Bundle Install?
Source code in place, database, Ruby (already comes in the Mac), so I’m ready to do Rails development, right? Well, no. As soon as I try running bundle install, things don’t quite work like I expected. No biggie; followed instructions found here, and I was back in the business.
Text Editor
I have tried to use the text editor that came with the Mac, but didn’t like it. I then tried TextWrangler, which has been only frustration (seriously, I can’t find a way to open a file in the darn thing, for crying out loud!). I’ll be getting TextMate, as that seems to be everybody’s favorite. Also, eventually I’ll get into MacVim, which sounds like something I’d like very much.
More Tools
I’m also going down Ben’s Ultimate List of tools for Mac users. Lots of good stuff in there.
Performance
I’ve noticed that running RSpec/Cucumber tests on my Mac is a LOT faster than on my super powerful PC. I don’t know why that is, but I can easily perceive that.
Summary
I’ve made the decision to only use my Mac for Rails development moving forward. Things run faster, more smoothly, etc. I’ve been using it as my primary development machine for the whole last week, and am enjoying it.
Joshua’s Bash presentation
Posted by claudiolassala in Software Development on July 14, 2011
A couple of weeks ago I attended Joshua Kessler’s presentation at the Houston Open Development User Group on Bash. I got the first hour on video made it available here. Quite a few things went flying over my head as I’m just getting started on using Bash, but it’s good that I have this recorded so I can come back to it and review things I missed this time around. ![]()
Josh shows how he uses Bash on daily basis to help him automate tasks and get stuff done.
Joshua Kessler is an IT Manager who has worked as a professional software developer with over a decade of experience. I’ve been using Linux and other un*x like operating systems as my primary OS from as far back as 1993. He is also the vice president of the Houston Open Development User Group.
